Customer Updates: Stryker Network Disruption > Read Now
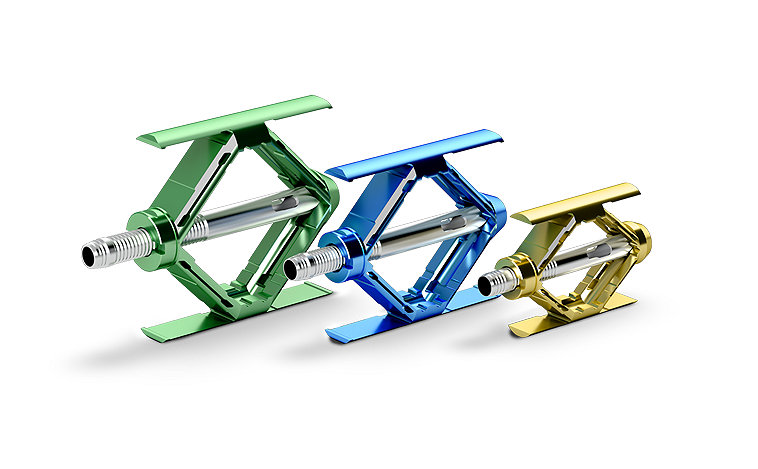
SpineJack
system
For 35 years, osteoporotic vertebral compression fracture (VCF) treatment has focused primarily on pain management. Traditional fracture treatments have overlooked reduction, fixation and restoration due to the limits of the instrumentation. The SpineJack system finally gives you the tools to take control of the procedure, restore the anatomy and protect your patients from adjacent level fractures. After decades, it’s time to take your treatment to the next level.
Preparation and expansion kits
The SpineJack system offers three implant kit sizes: 4.2mm, 5.0mm and 5.8mm. Each kit contains the appropriate instrumentation for the procedure, first for preparation, then for expansion and fracture reduction. The range of sizes accommodates various anatomies and fracture types.

4.2mm implant
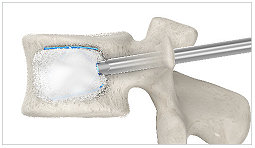
Control
The SpineJack system allows you to take full control of implant placement and expansion. Through bipedicular access and a series of cannulated steps, you achieve ideal positioning based on your assessment of the fracture type. The SpineJack implant expands in a craniocaudal direction, combatting the compression forces of the spine with up to 1,000 newtons of expansion force. It’s power and precision, met with uncompromising control.

5.0mm implant
Restore
Restoring anatomy is paramount when it comes to fracture treatment, and the SpineJack system maximizes every millimeter. Osteoporotic VCF treatment outcomes are heavily tied to the amount of height restored and the SpineJack system now gives you the tools and the confidence to truly restore vertebral body height like never before.

5.8mm implant
Protect
Benefits of the SpineJack system are both immediate and lasting. The SpineJack system protects against adjacent level fractures, which may occur due to changes in the load distributed to adjacent vertebral bodies after an osteoporotic compression fracture.1,2 It’s long-term protection that’s been a long time coming.
Vertebral dimensions
Pedicle width
A pedicle width of 0.8mm larger than the desired implant size is recommended to ensure safe placement (e.g., 4.2mm implant + 0.8mm = 5mm minimum pedicle width).
Optimal implant fit chart
| Pedicle diameter | Recommended kit |
| 5.0 - 5.8mm | 4.2mm |
| 5.8 - 6.6mm | 5.0mm |
| 6.6mm and over | 5.8mm |
Vertebral body height
The length of the vertebral body must also be measured, in order to define the largest implant size that can be opened in the vertebral body.
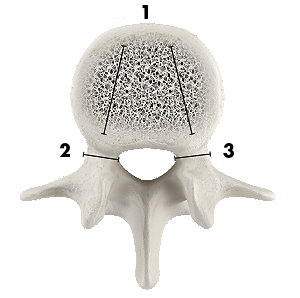
1. 30mm
2. 6.1mm pedicle diameter
3. 6.2mm pedicle diameter
Essentials

Access cannula

Reamer with working cannula

Cannula plug

Guidewire (2)

Template

Working cannula

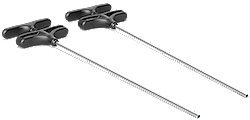
Expansion kit (2)
Cement fillers
Cement pushers
Injector transfer tubes
Procedure step by step

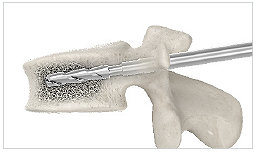
1. 11g access cannula
Insert the cannula into the posterior one-third of the vertebral body.
2. Guidewire
Insert the guidewire to the midpoint of the vertebral body, then remove the access cannula.
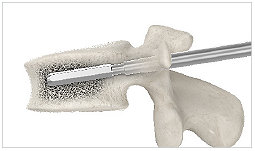
3. Reamer
Following the path of the guidewire, advance the reamer until it is entirely within the vertebral body.
4. Template
The template is now inserted to clean the implant site and verify the length of the implant.
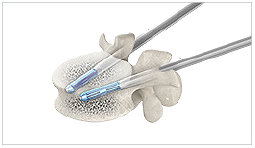
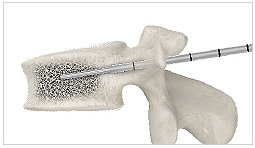
5. Unexpanded
Two SpineJacks are placed into the vertebral body.
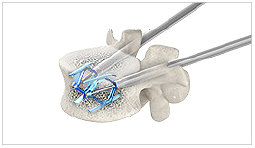
6. SpineJacks expanded (no cement)
The SpineJacks are expanded to reduce the fracture and restore the anatomy.
7. SpineJacks expanded (with cement)
Cement is injected to stabilize the fracture.
1. U.S. Food and Drug Administration, Center for Devices and Radiological Health. SpineJack Expansion Kit 510(k) Summary (K181262). Available from: https://www.accessdata.fda.gov/scripts/cdrh/cfdocs/cfpmn/pmn.cfm?ID=K181262.
2. Tzermiadianos M et al. Altered disc pressure profile after an osteoporotic vertebral fracture is a risk factor for adjacent vertebral body fracture. European Spine Journal. 2008; 17:1522-1530.